What You Need to Know About Nuts

This article originally appeared in our print magazine in 2013.
When many people start trad climbing, cams become their new best friend. They’re easy to use and contract to fit a variety of crack sizes. But don’t underestimate the benefits of their counterpart: the nut. With no moving parts (hence, “passive protection”), nuts are inexpensive, lightweight, sturdy, and it’s easy to judge a placement by eyeballing—many will fit a variety of spots because they can be positioned in four different orientations. Plus, thousands of nut-only first ascents were completed before cams were even invented. Here’s a rundown of how to use these amazing tools.
What you need to know about nuts
A typical set of nuts, also called wires or chocks, consists of 10 to 12 pieces that start small—less than .25” wide—and go up to about 1.3” for wedgeshaped nuts and 3.5” for six-sided hexes. These are “standard” sizes to look for when first building your rack. There are much smaller nuts, like RPs, and much larger ones, like hexes (see page 28 for more info on specialized passive pro). Because nuts cost much less than cams, it’s common to double up on the small sizes of the standard nut range for gear-intensive routes. Plus, it’s cheaper to leave nuts behind than cams if you have to build an emergency rappel anchor.

How to rack ’em
Rack a standard set of 10 to 12 nuts on two carabiners, organized by size, and clipped to a gear loop on your harness or a shoulder sling. Don’t be tempted to cram them all on one biner—this will make it harder to find the piece you need, and if you drop this biner, you’ll lose all your nuts.
How to place ’em
As with any removable protection, placing nuts takes practice. Work on technique with your feet on the ground at the base of a cliff or boulder, or practice slotting nuts on toprope. Follow trad routes as often as you can. This makes you a proficient cleaner, and you’ll see how a more experienced leader places all types of gear.
Principles of placing passive protection
- Rock quality. Make sure the rock is solid with no loose blocks or flakes that could easily pull off under force. A nut placement is only as good as the rock surrounding it.
- Direction of pull. Place the nut so the cable is oriented in the direction it will be pulled if you fall. This depends on how high above the piece you are when you fall, but generally you can place nuts so the pull is mostly down and slightly out.
- Constriction. Basically, nuts and hexes work by wedging into a tapered crack. Look for a crack that widens with height: Slot the nut into the wide part and wedge it down into the narrower section—this constriction will hold it in place. Avoid placements where the rock flares outward or downward, and beware of cracks that widen just below or behind your placement—if the nut shifts slightly, it could pop out of the wider spot.
- Surface contact. The more, the better. The nut should sit squarely in the crack.
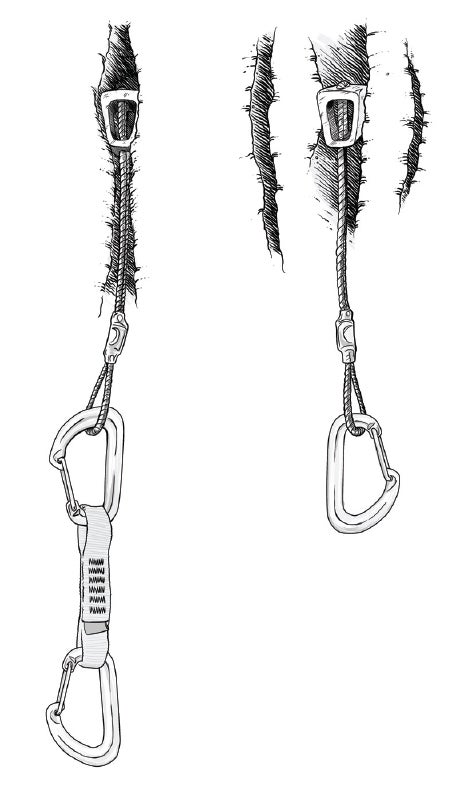
- Set it. Once you’re satisfied with the placement, set it in place. Clip a sling or quickdraw to the wire, and give the nut a gentle tug to make sure it doesn’t pop right out. (Pulling hard on a nut that pops immediately could cause you to lose your balance and fall.) Then deliver a sharp, downward pull, so it settles into the constriction. 6. Extend it. As you move above a nut, tension on the rope can pull up on the cable, possibly yanking the nut out of its placement. To minimize this danger, always clip a quickdraw or runner between the nut cable and the rope.
*It helps to remember #1 to #4 as the mnemonic RDCS: Running Dogs Chase Squirrels.
How to clean ’em
Observe how the nut was moved into its position, and then remove it in reverse. You might be able to gently push the nut up and out; if not, wiggle the cable to try to unseat it. If it’s still stuck, use a nut tool and tap the piece from below until it comes out of the crack. If possible, avoid yanking up on the cable, or you risk damaging the wires. If a nut seems hopelessly stuck, remember they are inexpensive to replace; don’t risk your safety to retrieve it.
Advanced nut placement techniques

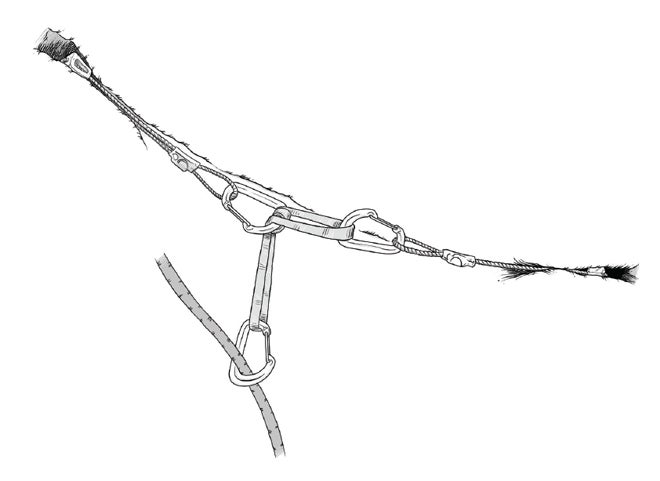
Horizontal cracks: Sometimes you can place a nut in a horizontal fissure by poking it into the crack and moving it sideways into a constriction that will hold it in place no matter what direction the pull comes. However, more often a nut placement will only work in one direction along a horizontal crack (just as many nuts in vertical cracks only protect against a downward pull). You can still use a nut that will only hold a sideways pull by placing another nut in “opposition.”
Camming action: Hexes can sometimes be placed in parallel-sided horizontals, much like a cam, by orienting it so the cable or sling points up and out of the crack. If the cable comes under load, it will cam the sides of the hex against the rock and hold it in place.
Find good placements so the two nuts’ cables are oriented toward each other; in other words, they will hold pulls in roughly opposite directions. Now, connect the two nuts with a sling: Clip a sling to one nut with a carabiner, and then thread the end of the sling through a biner clipped to the other nut, back up through the two strands of webbing, and back through the carabiner on the second nut. Clip a biner or quickdraw to the end of the sling, pull it to tension the sling and hold the two nuts in place, and clip the end to the rope.
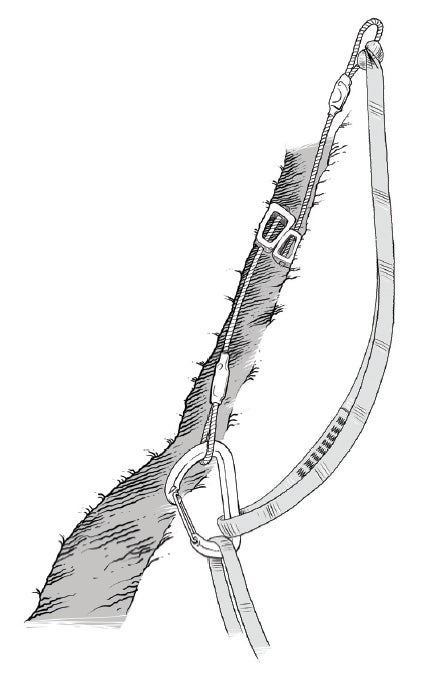
Thread ’em: The skinny wires on nuts can be fished through holes where no sling could ever fit. Thread the clipping end of the wire between limestone solution pockets or around chockstones wedged into a crack, and then clip a quickdraw to both ends of the cable for a natural piece of pro.

Stack ’em: Say you’re completely out of cams and large nuts, and you desperately need a piece to protect the final move on the pitch. In some cases, you may be able to stack two smaller nuts by holding one upside down against one side of the crack, and then wedging the other one, right side up, between the first nut and the rock. Give a good tug to set the pieces, and thread or clip the upside down nut to the second nut so you won’t lose it if the placement fails. It doesn’t often work as the placement can be tricky, but when it does, it’s a lifesaver.
Don’t forget to…
- Pay attention to shape. Some nuts are curved, so one side is concave and one is convex. You want the nut’s taper and curve to match the rock’s shape, wrapping around bends or irregularities in the crack. Sometimes you can simply flip the nut to get a better placement.
- Consider all options. Tapered nuts can be placed sideways in a crack—broad side facing out, narrow sides against the rock— which gives you more options when you’re getting low on gear. However, such placements may be less stable than the “normal” position. Hexes have many placement options—keep experimenting to find the ideal position. Nuts only protect a downward force.
- If there’s a chance of an upward pull or a sharp sideways force, consider a cam, which protects in all directions. At the start of a pitch, always place a solid piece of pro that will resist outward and upward pulls. This will prevent a rope from “zippering” out the gear if it comes under tension.
- Small pieces can be fussy. It can take more time to place a nut than a cam because you might have to try multiple sizes to wedge it just right. Get a solid stance before you start fiddling.
The post What You Need to Know About Nuts appeared first on Climbing.

